Rapid Reamer-less Prototyping of Tapered
Bores
Copyright
2007 David C. Daye
Feel
free to copy this work for desktop use and/or your individual study of piping.
You may not republish all or portions of this work in any form, or distribute
it
in any form, without permission. You may establish electronic pointers or links
to this page. Questions, problems, comments or requests for permission to
reprint may be e-mailed to me at CLICK HERE
History
 Many
readers are likely familiar with my “Penny-Chanter” invention that uses a set
of thin-wall straight brass tubes telescoped together to create an expanding
stepped-cylinder version of a tapered uilleann chanter bore. Craig Fischer
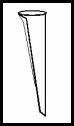
showed me that a full taper could be mathematically reproduced by the simple
method of cutting an inner cylindrical tube at a steep angle to create a
tapered “tail” which smoothly, gradually opens to the diameter of the next
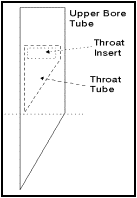
outer tube. The diagram shows the tubular sliding reed seat, throat and tapered
upper bore that reaches just past back D of the production Penny-Chanter.
Many
readers are likely familiar with my “Penny-Chanter” invention that uses a set
of thin-wall straight brass tubes telescoped together to create an expanding
stepped-cylinder version of a tapered uilleann chanter bore. Craig Fischer
showed me that a full taper could be mathematically reproduced by the simple
method of cutting an inner cylindrical tube at a steep angle to create a
tapered “tail” which smoothly, gradually opens to the diameter of the next
outer tube. The diagram shows the tubular sliding reed seat, throat and tapered
upper bore that reaches just past back D of the production Penny-Chanter.
Traditional makers and low-equipment experimenters can harness this property to use cheap, fast, low-skill tubular construction to model, explore and trouble-shoot fully tapered traditional designs before starting the painstaking process of making custom reamers for testing and production in wood.
Method
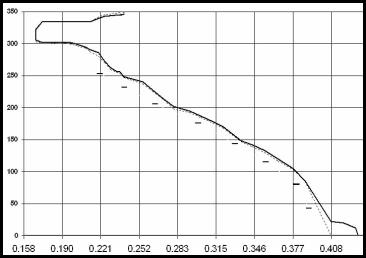
First plot your initial bore design, perhaps a historic instrument to copy, on graph paper or a computer spreadsheet chart as shown here. Make the diameter lines in 1/32” steps to represent the inner diameters of commercial thinwall brass tubing. This plot of a historic narrow-bore chanter is drawn as I usually do with throat up and bell down. The scale at left is distance in mm from the bell; across the bottom is bore inside diameter in steps of 1/32” like the brass tubing. The diameter scale is highly stretched so that perturbations in the bore are easily seen.
Note: tubing is sold by outer diameter. The inside diameters are nominally 1/32” smaller, but are actually .002” wider than nominal to allow for the telescoping fit. So be sure to start your diameter lines not at exactly 5/32” or .15625” for this narrow bore chanter, but at .15825”. The spacing is still exactly 1/32” or .03125” from that point. If you were to develop this prototype with a consistent .002” diameter error it will be inaccurate at predicting the behavior of the eventual reamed wood chanter, especially the octave relationship.
A more complete discussion by me of the stepped tube “Penny Chanter” construction method is referenced at the end of this article.
For maximum flexibility in prototyping, make the initial inner bore exactly like the Penny-Chanter’s, a stepped cylindrical taper. The tubes are superglued together in a telescoping fit, each larger size reaching lower into the bore than the previous inner tube, with each bottom cut square across at exactly the distance from the bell that its i.d. intersects with the bore plot. Assemble the entire bore core from brass, and epoxy it into a drilled-out wood or plastic exterior shell to replicate the outer shape of your design. I glue first, then turn the shell down to size later. Then drill the tone-holes and use a long ¼” drill bit spinning inside the bore to clear away any obstructions or torn tubing there.
 The
continuous taper is filled out by inserting diagonally-cut tails into the bore
between the tubing ends. We add the tails after assembly because this lets us
remove them to adjust the bore afterwards very easily.
The
continuous taper is filled out by inserting diagonally-cut tails into the bore
between the tubing ends. We add the tails after assembly because this lets us
remove them to adjust the bore afterwards very easily.
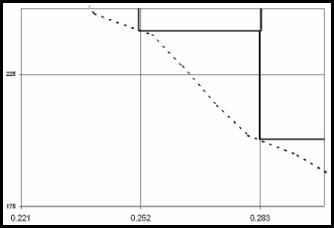
This chart excerpt shows, in its center-right, the bore taper spanning two tubing sizes. The dotted line is the plot of the original bore. Thicker rectangular shapes in the upper right quadrant represent the bottoms of cylindrical tubing that reach down to the bore plot line. The next diagram shows a tubing tail with a complex taper, cut and filed to reproduce the 3 different tapers that span this segment of the original bore. Note how the actual piece is much narrower than the width-exaggerated bore plot.
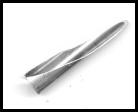
 The
photo shows a different tail with a straight conical taper at the wide end,
interrupted by a curved scooping slope toward the tip.
The
photo shows a different tail with a straight conical taper at the wide end,
interrupted by a curved scooping slope toward the tip.
Push each tail into position but do not glue it in place, so that it can be removed and reshaped if needed after testing. A long narrow brass tube is useful for this. The open side of each tail should face the toneholes so that airflow is not blocked to them. If a tail’s rounder end obstructs a hole, it should be opened in that area to clear the blockage. Repeat, adding tails to the bottom of each successively larger, longer cylindrical tube until the entire chanter bore is filled from throat to bell with tapered tails.
Alterations
After testing, if you want a bore section to be “reamed deeper,” it can be accomplished by first removing tails from that zone. The point of a nail can be inserted into a tonehole to pry a tail toward the bell until it loosens enough to fall out. If any squarecut tube ends are too long, they can be drilled back using a long drill bit of the correct 1/32” step diameter as required. The tails are altered or replaced to replicate the new bore curve, and then pushed into position. If a segment of bore needs to be “un-reamed” or made narrower, make new tails for that segment, and if any of the square-cut tubes need to be lengthened, simply add a few mm of cylindrical length to the wide inner end of the tail, and shape the tail to model the new taper.
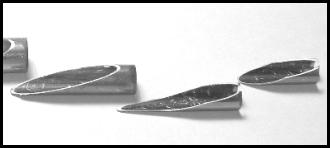
Photo shows a progression of tails illustrating both conical zones and tuning scoops. Tails at left have short cylindrical segments added to wide ends.
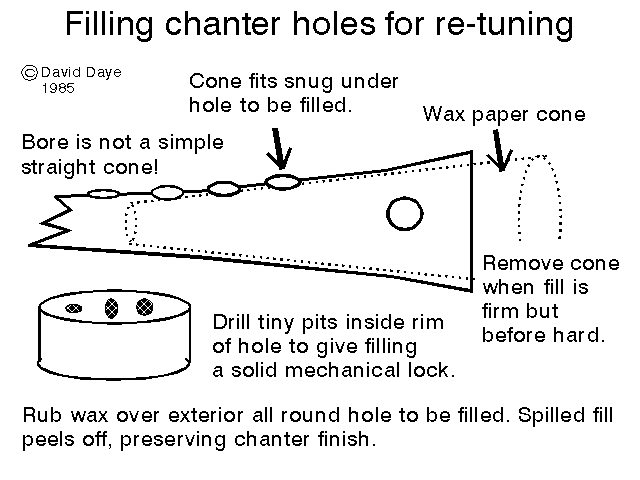
Toneholes are easily filled in
for moving or re-drilling. Simply remove the tail that lies behind the hole,
leaving the bore beneath it a cylinder. With a tiny drill, make some pits in
the side walls of the hole to mechanically lock the filler later. Wax and
insert a metal tube that snugly fits inside at that position, fill the tonehole
with epoxy, cover the exterior with tape, let set to 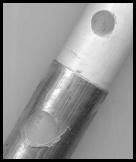 initial
firmness, twist the tube to loosen, and remove tape and tubing. The entire
chanter can be re-drilled by rotating 20-30 degrees and starting over. The
photo shows one of my prototype “Penny-Chanters” with holes sealed for another
round of drilling. More information is at: http://www.daye1.com/bagpage/chan440.gif
initial
firmness, twist the tube to loosen, and remove tape and tubing. The entire
chanter can be re-drilled by rotating 20-30 degrees and starting over. The
photo shows one of my prototype “Penny-Chanters” with holes sealed for another
round of drilling. More information is at: http://www.daye1.com/bagpage/chan440.gif
Chanter Design Tips
There isn’t space here to discuss the many common chanter adjustments and their effects and side-effects. By now most or all the information is in public circulation, though.
Tonehole geometry: Pitches of the notes and the matching of their 2 octaves are affected by the diameter, undercutting and depth of toneholes (which influence their loudness and tone as well), by positional change up or down the bore, and by bore expansion or contraction immediately upwind of the hole.
Adjustment of 1st octave notes is very straightforward. 2nd octave notes also have one or two additional “hot” bore adjustment zones some distance from the holes toward the reed where a bore enlargement may make them sharper, and in some positions flatter. The Hard D is controlled by adjusting the 4 harmonics that create it, as discussed in Craig Fischer’s 2001 article referenced below.
Of course, every cm of bore affects multiple notes, so fine-tuning remains as much art as science -- even when knowing multiple adjustments for every response. Unless you’re able to devise the perfect chanter, strive to spread the compromises over many notes and both octaves so that no one or two notes are chronically distracting to hold or play in tune. Especially avoid making the 1st octave perfect at the outset, thereby crowding all the trouble into the 2nd octave, which is trouble enough in a good chanter. Finally, when adjusting one isolated note, consider making only partial corrections using several different moves. This way the side-effects will be different and negligible, whereas the intended effect will be the same and cumulative.
The taper-tube construction should be accurate for designing wood-chanter tools for overall bore tapers, shell thicknesses, tonehole positions and sizes, and for finding the positions and relative sizes of bore perturbations. The final sizes of short tuning scoop reamers will probably have to wait for testing in the traditional tooling.
References:
Construction—
David Daye’s Bagpipe Page:
“Make Your Own Working Penny Chanter,” David Daye, Pipers’ Review, Summer 1997
Identical design online at: http://www.daye1.com/bagpage/makepipe/uppc_lrd.html
Bore Measuring page:
http://www.daye1.com/bagpage/makepipe/chntcopy.html
Telescoping brass tubing: made by K&S
Mfg. of half-hard brass in 1/32” O.D. increments and .014” wall thickness. Sold
by many hobby shops and online vendors such as http://www.smallparts.com
Theory and Adjustment--
Hard D Tuning: “Pipe Bores and Pipe Acoustics,” Craig Fischer, Ceol na hEireann no. 3, 2001
Bore Tuning General: “Phrenology,” Craig Fischer, Pipers’ Review, Autumn 1999
Craig Fischer’s square chanter building and adjusting page:
http://www.daye1.com/bagpage/makepipe/squint1.html
Enjoy!
David Daye
Whidbey Island, WA USA