Make a Square Wooden Chanter for the Irish Uilleann
Pipes
By Craig Fischer
Minor Update 10-1997 Marked ***
2020 June -- Reeds for Square Chanter Now Sold
by David Daye
Click here
for Daye reed sales page.
Copyright 1997 Craig Fischer, all text, image and sound files presented
here.
Feel free to copy this work for desktop use and/or your individual study
of piping. You may not republish all or any portions of this work in any
form, or distribute it in any form, without permission. You may establish
electronic pointers or links to this page. Questions, problems, comments
or requests for permission to reprint may be e-mailed to me at cfischer@olis.net.au.***
Table of Contents
Overview
Tools
Helpful Aids
Assembly
Finger Hole Table
Tuning
Shaping the Top Tenon
Making a Reed
Overview
Here is a method of making a wooden Irish pipe chanter
which doesn't require the use of a lathe or any specialised tools. It is
not quite as simple to build as the Penny Chanter but if you prefer wood
or wood substitutes then this is a good way to start. A little experienced
help may be necessary, especially when you get to the stage of tuning and
reed adjusting, but this is not an expensive project, and if one chanter
goes awry then another can be made. I would recommend making one out of
very cheap wood or plywood first, to learn the method.
This design relies on the fact that the bore of any woodwind need not be
circular in cross section and can be made any shape within reason so long
as the cross sectional area at a given place along the instrument is the
right size.

What I have done is to take the bore diameters for one
of the Quinn chanters detailed by David (makepipe/upquinn.html)
and find a straight line which is always the same value or less than the
Quinn bore. This is to say that it touches the Quinn bore but is never
larger than it. I calculated the cross sectional area which this gives
and then calculated a square with the same area. The result is a square
cone which has the same or less area point by point as the Quinn chanters
do. Using a square bore enables construction of the chanter as a box from
4 flat pieces of wood cut to the right size and shape before gluing. The
initial internal dimensions of this cone will be 3.7 x 3.7 mm at one end
to 11.5 by 11.5mm at the other, over a length of 365mm. The thickness of
the wood used for the four sides will determine the outside dimensions
of it.
Once three sides of this cone are assembled, a small
gouge is used to enlarge the bore in a few places on the fourth face before
it is glued down. If the fingerholes are drilled and lightly undercut before
the chanter is glued together it can be temporarily assembled with silicon
rubber and tested. If any changes need to be made to the bore, the 'lid'
can be popped off and adjustments made. Tuning the chanter to work well
is a process of either enlarging the fingerholes or altering the bore as
circumstances require.
While making a few of these to simplify the process
and to make sure it was repeatable, I have changed the design slightly.
It is no longer quite a square Quinn chanter. It does work very well though,
better than many ordinary chanters. If you wish to stick to the Quinn sizes
I have included the neccessary information.
Click here to see charts
and graphs of Quinn comparison.
The design here is optimised for a wide headed reed
with a tubing staple. A few different types of reed should work however,
and if you follow the method, you might be able to adapt the design to
a reed of your own choosing. I am open to suggestion about which type of
reed might be the easiest to make and get going.
Tools
This chanter can be made by any competent craftsmen
with the following limited tool set:
- A vernier calliper
- A ruler and pencil.
- A hand drill and a few drill bits
- A short hardware store fluted taper reamer ( see
below for substitutes)
- 3-6 ml of supa glue
- A small tube of silicon rubber
- A small hobbyists gouge and knife
- A small hand plane
- A hand saw or access to a bandsaw
- A file or two
- A surform rasp or a spokeshave
- At least 3 small screw clamps
- Some spring clamps or large spring loaded clothes
pegs
- Assorted sandpaper
Most of these things can be bought from "cheap"
shops, adequate for this method
The reamer: These are quite common and not very dear.
The one I use tapers from 3mm to 16mm over about 85mm. This is a nice taper,suitable
for a read seat, but the larger end doesn't need to be bigger than 8mm.
If you cannot find one of these, you can make one by grinding the same
taper on a piece of 8mm (5/16") mild steel rod and then grinding it
in half lengthways to make a D section reamer. Leave a bit of plain rod
at one end to hold it with. Alternatively you could sharpen the tang of
a file or cut one out of flat steel or brass and sharpen the edges. If
you can't easily get any of these then use a rat tail file, about 3/16"
max. diameter.
The gouge: like those from cheap wood carving or
lino-cutting sets. About 3 to 5 mm wide, fairly shallow, nice and sharp.
Helpful Aids
There are some helpers you can build which will make
it a lot easier:
- A smooth and flat strip of wood or particle board
about 450 mm long and 75 mm wide to which some good quality 80 grit sandpaper
has been glued.
- A benchhook made from ~3/4" flat wood of any
type. This has two cross pieces of about 2" x 1" glued at each
end on opposite faces so that it can hook onto a bench or table and give
a stop on the other end for planing the strips of wood against. These can
be made very elaborate with adjustable stops, split levels and holes for
screw clamps to hook into.
- A piece of 1/4" plastic sheet cut and filed
to be as wide as the exact internal size of the chanter. This is used as
a spacer when gluing on the 2nd side, the square equivalent of a reamer.
Plastic is better than wood for this. If supaglue is used, the spacer might
become incorporated into the chanter! A thinner sheet of plastic would
be fine, or two of these with some spacers sandwiched between them. Even
with plastic spacers it will be necessary to wax or oil them, and to leave
them in place no longer than it takes to glue and clamp the side.
Separate short spacers can also be used, and drill
bits glued temporarily to each end of the base to make sure the dimensions
are correct.
The wood required for the chanter consists of three
flat strips of hardwood about 370 mm long 28mm wide and 7mm thick. Faced
plywood will work, plastic if you wish. Anything smooth, flat and glueable.One
of these will be the base, one the top, and one will yield two sides. The
dimensions of the sides are those of the inside diameter of the cone. They
have a straight taper from 3.7mm to 11.5 mm wide and a final length of
365mm. The other two pieces need to be as wide as this plus twice the thickness
of the side pieces, so maybe two of these could be cut.out of one larger
piece to save material.
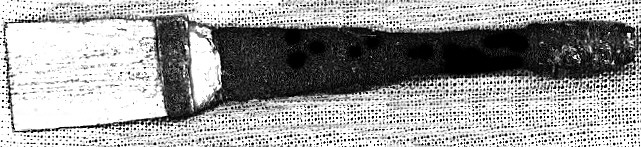
I have made square chanters from ebony, cherry, maple,
zebrano and cocobolo. They all work well. In addition to this they can
look very similar to a Taylor chanter, depending on how the exterior is
finished. Keys can be easily added by gluing on extra blocks to act as
key supports or by digging channels in the back and sides. The outside
of the chanter need not be symmetrical, except at the reed end where it
is shaped to fit into a chanter stock or windcap. It is best if the reed
sits right in the middle of this wind cap. It is a good idea to make the
top piece containing the fingerholes no thinner than 7mm, fingerhole depth
is a critical variable. If thicker wood than 7mm is used, it can be thinned
over the holes from the outside, maybe to give a comfortable hollow for
fingers to sit.
Assembly
First take one of the pieces of wood to be the base
for assembly and ultimately the back of the chanter. If any piece of the
wood is a little thinner use it here since the thumb hole can afford to
be less deep than the other holes. With a good ruler check that it is nice
and flat on one face. If not then work it carefully back and forth on the
large sanding block until it is.
Plane both edges of the piece for both sides until
they are as level as possible, check them by eye and ruler. Sand them on
the block if they need further levelling. Don't plane them again after
sanding though, as the grit will dull the plane. When they are flat and
square, rule lines showing the final size for both sides, one near to each
straight edge, and cut them out slightly larger than required.
Rule a straight line on the face of the base piece,
near to the edge of it, and after running a line of glue along the edge
of one side piece, carefully clamp it down alongside the line, flexing
it as you go if need be to keep it straight to the line.
After the glue has dried remove the clamps. Glue
the 9/64" drill bit to the base as shown and put the spacer at its
correct position. If you are not using a spacer, glue a 7/16" drill
bit at the wide end, about 15mm into the bore.
Now run a bead of glue along the edge of the other
side piece and carefully clamp it in place. Take care that it is snug against
the spacers or drill bit, especially at the narrowest end of the taper.
This is more critical than the large end. As soon as it is clamped up remove
the spacer. Lever it out carefully if it is tight.
Remove the clamps when the glue has set, and plane
the rough edge of the sides to near the final line. Next use the sanding
block to level them to the line and get them nicely flat. The piece of
wood for the lid should sit on top of these with very little gap visible
and requiring little pressure to achieve this. When glued up, even temporarily,
this has to make a perfectly airtight seal.
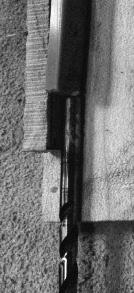
Now is the time to start forming the round throat
or narrow end of the bore.
Clamp the lid on temporarily with two or three small
screw clamps. Check the general alignment of it and put some pencil marks
on it in places that will help you to take it off and put it back on again
just the same.
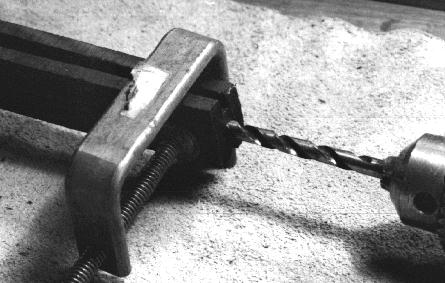
Firstly start enlarging the reed seat with the small
tapered reamer, until the outside size of this is larger than 5 mm. Take
a 13/64" (5.16mm) drill bit and drill along through this end, keeping
it carefully aligned with the center axis of the bore. Drill as deep as
the drill can go, you cannot go too far, the cone quickly becomes larger
than it. After that, ream the top some more, until the exit diameter is
about 6mm. Not quite it's final size, this can be finished after the lid
is glued on, out to 7mm.
While the lid is still clamped on, mark the size
of it with a pencil along the sides. Remove it and cut and plane it almost
up to these lines.
Overall length of the chanter is 365mm. The back
D' is the thumbhole, all the rest are on the front or lid piece.
Fingerhole Table:
Hole
Name |
Distance
From Top
(mm) |
Drill
Size
(inch) |
Aprrox.
Final Size
(inch) |
Back
D |
92.5 |
7/32 |
9/32 |
| C# |
110 |
11/64 |
7/32 |
| B |
139 |
9/64 |
7/32 |
| A |
172 |
3/16 |
9/32 |
| G |
212 |
11/64 |
11/64 |
| F# |
242 |
7/32 |
9/32 |
| E |
275 |
11/64 |
11/64 |
| E flt |
306 |
3/16 |
1/4 to
9/32 |
Nowhere else does the opportunity exist to undercut
fingerholes from the inside of a woodwind instrument. The final sizes may
vary slightly and include a small amount of taper produced by reaming them
to size from the inside face of the lid plus some extra possible undercutting
to tune the notes a little higher. This can be done with a rat tail file.
There should not be too much undercut. The very edges of the hole, inside
and out, may be smoothed with a little sandpaper or a rose countersink.
Mark the position of the thumbhole on the base piece
and drill it to the minimum size, also draw a centreline on the lid, mark
and drill the rest of the fingerholes to their starting sizes.Ream them
from the inside face a little, to give them an initial undercut. The final
size of the thumbhole is slightly larger than the inside width of the cone.
This means that it cuts into the side walls a little. This doesn't seem
to cause any problems.
Make the initial enlargements to the bore on the
inside face of the lid with the small gouge.

The darker shaded section on the left of the sketch is the enlargement
from drilling out the throat, then there is an elliptical area from about
30mm down to about 90mm down. The maximum depth is around 1.5mm in the
widest part, shallower at each end, like an oval dish. Careful with this
one!
The next area is from above the B hole to about half way between the
B and A holes. Same shape and about 1.2mm deep to start.
A similar one is from just below the F# hole right up to the E hole,
even cutting into the edge of it.
The last one is quite large. This tunes the bottom D up to pitch. From
below the Eb hole to just inside the chanter and about 11mm wide , 1.2
mm deep at first.
Now the chanter can be made airtight by gluing the
lid down with a little silicon rubber and clamping it on. Put the clamps
in places which wont interfere with the fingerholes. It is best to leave
them on while making temporary adjustments, removing the lid and replacing
it.
Tuning
It is a common belief that the bore shape of the
Irish pipes is a perfectly straight cone. Nothing could be further from
the truth as far as old or new chanters which work well are concerned.
There are many parts of the bore where small adjustments have very large
consequences and this chanter presents a fantastic opportunity to experiment
with these. I will describe the ones that are essential to making this
chanter work well, and leave the rest for your own experimentation. All
necessary bore enlargements can be made with the small gouge. If you go
too far, you can fill some in with epoxy, or even start again with a new
lid.
The most crucial area is in the part of the bore
between where the reed sits and the thumbhole. The so-called upper bore.
In this design, a round throat opening out into a square one provides the
first important detail, a flare into the bore proper where the corners
of the square start to exceed the diameter of the circle.
As soon as this flare is established we need to increase
it, from about 30 mm along or so. The size and position of this increase
affects the stability of hard D and the ease of the transition from the
lower to the upper octave.
The area 1/2 way to the thumb controls the truth
of the top octave of the upper hand. Removing more material here will flatten
this upper octave. Hopefully, with the suggested reed, you will find this
sharp to begin with, giving some scope for tuning it. This part of the
bore can also have a strong effect on hard D. If the upper octave, especially
A', is too sharp so will be hard D and it may even become unstable.
If the bore is too small just above the thumbhole,
back D' may be weak, and possibly flat. This bore area affects the strength
of this while the size and position of the hole govern the pitch more.
If back D seems a little weak, possibly flat, and it's not due to a poor
reed, enlarge the bore here. This will have a secondary effect on hard
D.
Below this, in the area of the fingerholes, there
are many complicated effects on chanter performance and tuning. If you
stick to the size and position of holes and the few simple bore enlargements
I've suggested, you will not go far wrong here. The general idea for tuning
fingerholes is to enlarge the holes to bring a note up to pitch. This should
be done from the higher pitched holes down and the holes should not be
made larger than the suggested final sizes.
A sophistication here is that if you have already
got the upper top octave about right, while a note is still a little flat
and the pitch of it's octave is sharper, enlarge only the hole. This is
equivalent to reducing the depth of this hole, from the OUTSIDE. If the
bottom octave of a note seems sharper than the top one and the bottom one
is not yet up to pitch, enlarge the bore immediately above that hole, as
far up the bore as the edge of the next hole.
If the octave is about right and the hole is at it's
maximum size and the note is not yet high enough, gouge a little wood out
of the bore above the fingerhole. This may be especially necessary for
the high D', the A and the E.
It is always better to start from a slightly flat
note and enlarge the hole or the bore to bring it up to pitch. If the upper
top octave is already flat, and tuning the holes and adjusting the bore
doesn't fix it, you may need to fill in the 1/2 way area in the upper bore
with some epoxy or glue a little wood back in there.
The fingerholes can be enlarged with the simple tapered
reamer or a 1/4" rat tail file and tubes of coarse sandpaper.
If it happens that you cannot get the top octave
sharp or flat enough for a particular note, then you can make a new lid
with the hole moved 2mm up or down. Move it down the bore if the top octave
is too sharp and up towards the reed if the top octave is too flat. Don't
move it too far though, or you will end up with other nasty problems. If
you find you are moving too far from the figures given, it is time to check
the internal size of what you have made, and also to test it for leaks.
You will probably never be able to get E' higher
than slightly flat when played on the knee, and moving the F# hole down
the bore will not have the same octave flattening effect that it does on
other notes nearby, except when it is played off the knee.
As you might see amongst all of this, there are four
main independant variables for tuning a note and it's octave :- The bore
size above the hole, the depth of the hole, the size of the hole, and the
position of the hole. This is assuming that the upper bore is already finalised.
For all of the above areas I have suggested a good
initial amount of enlargement. If this doesn't produce a chanter which
behaves nicely, then follow these suggestions to remedy it. As I make more
of these, experiment with reeds and so forth, I will make revisions.
If you are happy with the result so far, you can
clean off all of the silicon rubber, which has probably not even set yet,
from all gluing surfaces with some (methylated spirit). When the surfaces
have dried out a little, lightly sand them on the flat board.
NOW YOU CAN GLUE THE LID ON WITH SUPAGLUE !
Align it carefully. Clamp it well, and run extra
beads of glue along outside edges, especially if there are any gaps visible.
When this is dry, plane or sand any overhangs away.
Shaping the Top Tenon:
The chanter now being square or rectangular in cross
section, we need to make it circular at the reed end so that it can fit
in the windcap. This could be done using a wood lathe, making a square
plug for the other end and turning it between centres. IF the wood used
is thick enough, the whole outside can be made round, including blocks
for keys. However the following method is less hazardous and doesn't use
a lathe.
Mark the length of the tenon around all 4 faces,
about 35mm long is suitable here. Draw a circle on the end, centered on
the reed socket, slightly smaller than the windcap id if this is small,
or as big as possible otherwise.
With a flat file or a knife, first make the square
octagonal, then remove the corners of the octagon and so on, approaching
the drawn circle.
When it is close to this and starts to look smooth,
sand it around with coarse and fine sandpaper until it is as round as possible.
If you are going to use cork to make it airtight
then simply glue this on with rubber cement. Rubberised automotive sheet
cork is good for this. If you are going to use thread to make a seal, you
can score some lines around, known in the bagpipe world as combing. Use
a triangular file or a hacksaw blade with the set ground off the teeth
to do this.
It is a good idea to do something like this at the
bottom end of the chanter. A short piece of tubing can be fitted there
to reinforce the glue joins. You should at least remove the square corners,
no matter how you are going to shape the rest of the chanter exterior.
It may be necessary to fit a wider disk at the top
tenon as on a regular chanter, to stop it from going too far into the windcap.
Adjust the length of the tenon accordingly.
Shape the rest of the chanter however you wish.
Above all else, use your imagination to create ways
of making chanters like this!
Making a Reed
The overal length of the assembled reed is 78mm and
the lowest crow is around G#'.
The staple is hobbitube with a 4.1mm id, 51mm long.
The eye is formed to a 1.7mm minimum diameter and the taper starts at about
1/3 of the way to the eye. The taper starts gently , stays steady for a
while and finally gets steeper towards the eye, in the last 8mm. To check
the taper, a 3.75mm (9/64") rod should fit to 21mm in.
The head is 13.6mm wide at the tip tapering to 13mm
wide, 15 mm down from the tip, then tapering more steeply to11.5mm wide
just above the bridle. After that it tapers to a sharp point under the
binding. The total cane length of one blade is 53mm. The amount of cane
exposed above a 4mm copper bridle is about 22mm.
The slip should be worked to about a 50mm inside
diameter.*** A slip with a 26mm outside diameter would be suitable.
The winding goes to about 51mm from the bottom of
the reed.
The usual reed making cautions and caveats apply!
There are many well written books on how to make reeds like this one for
the Irish pipes.
Go to Top
Back to David Daye's Bagpipe Page