 1.
Setting the Reed to an Easy Strength
1.
Setting the Reed to an Easy StrengthCopyright 2010 David C. Daye
1.
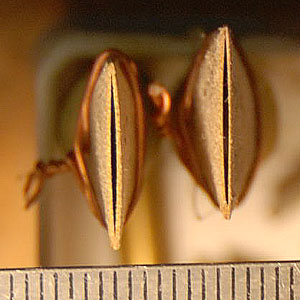
Setting the Reed to an Easy StrengthThe wire or metal bridle wrapped around the lower portion of the exposed cane blades should moved up or down to make the reed easy to play. There is no need for learners to use a strong reed, and in fact some of the great professional players such as Liam O'Flynn and the late pipe-maker Leo Rowesome used reeds that were easy. They are obviously comfortable and playing with no effort in film and video footage.
The normal amount of opening is quite small, approximately 1/3 mm to 1/2 mm wide at the widest part in the center of the lips. You may find that an even narrower opening than shown here is best for you. My "Apartment" Penny-Chanter was specially designed to accept a reed that is nearly closed, in order to play quietly for practicing. The opening of an Apartment Penny-Chanter should be half as wide as the reeds in this photo, or possibly 1/4 as wide.
The common fault here is inexperience in covering the holes, so that air is leaking from one or more higher holes.
But there could be a fault in the chanter. If your chanter has any keys, they might be leaking, and a few percent of Penny-Chanters, especially if home-built, have the potential for internal leaks because of the layered construction.
To enable you to make a good test when you have no experience playing and judging the instrument, the goal is to simplify the actions you're using to operate the instrument. This way you can concentrate fully on the pressure as you test the notes. To do this, don't play tunes or ornaments, only play a series of 2-4 melody notes, and use a fully filled bag so that you can play by squeezing the bag alone, and don't need to pump the bellows during the test after the instrument begins to sound.
If the chanter will not come down the scale to B or A, you probably have a high C key. Wrap some string around the chanter between the C# and B holes to hold the pad of the key tightly against the chanter.
Try the test again. If you have a high C key, and tightening the pad against the chanter makes the chanter play properly, it means that the key is leaking. If you are a new player, or have a new chanter, contact the maker before attempting an adjustment. If you wish, especially if you built your own Penny-Chanter or bought one used, click here to jump to the description of how to fix a leaking key. (Link not yet active.)
Otherwise let's go on to test the lower notes.
If at some point they do not, stop, and if you have any chromatic keys, use tape or string wrapping to hold them tighter against the chanter, and repeat the testing.
If you have no keys, let's try testing you the piper.
Use sticky electricial tape to seal all the holes on the chanter: back D, and all the finger holes.
Pump up the set and see if you can play a bottom D.
If not, the chanter or reed has a defect. To help pinpoint it, peel tape off the lowest hole and test again. Reapeat as often as necessary so that the chanter is playing higher and higher notes, and write down the name of the first note that plays correctly. Then contact the maker of the reed if it's new, or the chanter if it's new.
If you built your own chanter, and drilled a tiny hole in it near the top to allow air to escape when you glued the outer shell onto the brass bore core, the chanter may be leaking internally through this hole. If it's under the tenon binding or the upper ferrule, remove whatever is covering it, and if the hole does not appear to be filled with epoxy, make up a small amount of epoxy or even some soft bees wax. Push it into the hole and if using glue, allow it to set. Then try the chanter again.
The uilleann chanter needs an increase in air pressure from the bag to play the 2nd octave notes. It should need only a very slight increase to play Ghost D (E-flat), E and F# in the 2nd octave, perhaps 15-20% or so. It will need a little more pressure to play the middle and upper 2nd octave notes, but not much more than about 33% or 1/3 more than the notes in the middle of the 1st octave.
Learners almost always feel that it takes a great deal more pressure to play the 2nd octave. In most cases this is due to inexperience, but it's important to verify that the chanter and reed are responding properly. Otherwise the beginner will be straining too hard and may develop some bad habits from working too hard.
To enable you to make a good test when you have no experience playing and judging the instrument, the goal is to simplify the actions you're using to operate the instrument. This way you can concentrate fully on the pressure as you test the notes. To do this, don't play tunes or ornaments, only play a series of 2-4 melody notes, and use a fully filled bag so that you don't need to pump both the bag and the bellows during the test.
If not, stop, and repeat the test using a greater pressure increase, perhaps 33% or 1/3 extra pressure, or even 50% if needed to keep the G playing in the second octave.
If you need a big 40-50% pressure increase to play G in the 2nd octave, your reed probably is defective.
Otherwise let's go on to test the middle 2nd octave.
If not, stop, and repeat the test using a greater pressure increase, perhaps even 50% if needed to keep the G and A playing in the second octave. If you need a big 40-50% pressure increase to play G in the 2nd octave, your reed probably is defective.
Otherwise let's go on to test the high 2nd octave.
If not, stop, and repeat the test using a greater pressure increase, perhaps 50% - 60% or more if needed to reach C# staying in the second octave. If you need the big 40-60% pressure increase to reach C# in the 2nd octave, your reed probably is defective.
More coming.