Uilleann Pipe Octave Trouble
Causes & Cures
Copyright 1996, 2009, 2010 David C. Daye, all text, image and
sound files presented here.
Feel free to copy this work for desktop use and/or your individual study
of piping. You may not republish all or any portions of this work in any
form, or distribute it in any form, without permission. You may establish
electronic pointers or links to this page. Questions, problems, comments
or requests for permission to reprint may be e-mailed to me at CLICK
HERE
Updated 28 Jan 2010
7th Draft 8 June 2009
6th Draft 9 September 1996
Original 4 September 1996
Caution: I have tested each of these diagnoses and remedies
and found them to work for my chanter, cane, climate, style of reed, and
other circumstances. However I do not make reeds professionally nor sell
my knowlege (yet), so you should consider all of this to be tentative.
If you have found any of this to be in error, or have other comments, please
feel free to contact me at CLICK HERE
with your ideas or suggestions.
Contents
Introduction
Applicability
 I make a common
"generic Rowesome" type reed, as I have heard some reedmakers
call it. It uses a standard-taper metal staple (narrower end inserted into
the blades). The reed head is roughly 1/2" wide and 1" to 1-1/8"
long above the eye of the staple and has sides which are parallel in the
top 1/4 to 3/4 of the length of the blades. I use either a low-mount copper
collar (bridle) or a sliding type brass bridle which stays in the lower
1/3 of the head and is moved about 1/8" for adjustment. My most common
type of cane at present is Rigotti brand French bassoon cane, which is
harder than Spanish cane used by many makers and has very hard bark. The
"dunk test" shows that this cane
varies from slightly to very hard, with a sink percentage ranging from
50% to 70% or more, compared to Spanish cane which I find usually in the
45% to 58% range. I limit my efforts to the softer bassoon cane testing
50% to 60% at this time.
I make a common
"generic Rowesome" type reed, as I have heard some reedmakers
call it. It uses a standard-taper metal staple (narrower end inserted into
the blades). The reed head is roughly 1/2" wide and 1" to 1-1/8"
long above the eye of the staple and has sides which are parallel in the
top 1/4 to 3/4 of the length of the blades. I use either a low-mount copper
collar (bridle) or a sliding type brass bridle which stays in the lower
1/3 of the head and is moved about 1/8" for adjustment. My most common
type of cane at present is Rigotti brand French bassoon cane, which is
harder than Spanish cane used by many makers and has very hard bark. The
"dunk test" shows that this cane
varies from slightly to very hard, with a sink percentage ranging from
50% to 70% or more, compared to Spanish cane which I find usually in the
45% to 58% range. I limit my efforts to the softer bassoon cane testing
50% to 60% at this time.
How the 2nd Octave Works

The 2nd octave is achieved by a combination of stiffness along the vertical
centerline of the blades and flexibility to either side. Although many
different shapes and depths of scrapes can work, the relationship between
the centerline and the adjacent areas is rather critical. Self-taught or
book-taught reedmakers seem especially likely to have problems with this
because the relationship is subtle and not well discussed in existing texts.
Scraping methods are also not well described in print nor is suitable cane
material (hardness, stiffness) well described either. Making matters worse,
the shape of an existing reed does not necessarily reveal the steps by
which it was produced. Cane deforms as it is scraped, due to the pressure
of binding, so the final shape was created by both scraping and settling
which is not always obvious to the self-teacher. So an isolated learner
attempting to duplicate a working reed can be misled into scraping too
much in critical areas.
There are several main causes for difficulty hitting or holding the
2nd octave, in my experience. They are reflected in the topics shown below,
which include remedies where I have found them, followed by some thoughts
about preventative measures in future reeds.
Basic Reed Strength
Every reed plays best at some particular basic strength. If its collar
or bridle is set so as to open it up for greater loudness and strength
than this ideal, the 2nd octave will become disproportionately harder to
attain and hold. The first remedy to seek for any reed with octave difficulty
is to simply close it down slightly. It may behave perfectly well, if playing
somewhat quieter and sharper, when the elevation is reduced.
Future reeds might be designed to play louder and stronger by leaving
a bit more cane on the scrape in order to support greater elevation, and
also perhaps leaving the blades slightly longer to compensate for tuning
imbalance that would otherwise be created by a more open reed.
Bridle or Collar
A second common problem is that the bridle or collar may be at the wrong
location on the blades, even if it is holding the elevation to the correct
amount. A quick fix is to try re-shaping the collar to allow it to be repositioned
a bit higher or lower on the blades (usually higher is better for this)
while maintaining the same elevation at the lips. Experiment in small changes;
even 1/32" can make the critical difference. There may be side effects,
such as gurgling bottom D and sharpened and strengthened back D, which
will be more likely and greater the greater the distance the collar is
moved.
In truth, if the problem is fixed by repositioning the collar, there
is probably a bit of an imbalance in the scrape. If you are satisfied with
by repositioning the collar, leave well enough alone. Otherwsie you may
wish to read the Scrape Imbalances section
below and the notes about avoiding octave problem in future reeds.
Static Leaks
"Static" leaks are any leaks which exist regardless of whether
the reed is vibrating or not. These are simple to find and cure, and partly
for this reason they receive most of the discussion in existing texts.
However after noting that several of my best reeds were distinctly leaky,
I have concluded that leaks are probably not the primary culprit in many
if not most cases, and that leaks are only an aggravating factor. However:
A reed which suddenly develops octave difficulty may simply be loose
in the chanter. Remove the cap carefully--be ready to catch the reed if
it has come loose--and check to see that the reed is seated snugly in the
head of the chanter. Some pipers prefer to rub a little bees' wax or black
wax around the hemping at the base of the reed to make the seal extra airtight.
This can't hurt, and although it may not help a really good reed, it may
provide a little extra insurance for a problematic reed.
The other common locations of static leaks are the edges of the blades,
and the binding around the tails. A good quick test is to seal the lips
of the blades by pressing them against a finger (not squeezing them shut)
and inhaling through the bottom of the staple. There should be no airflow
detected. If there is airflow, try using other fingers to seal the edges
of the blades first low near the bridle and then higher in the middle to
upper edges. If either of these steps stops the airflow, the edges of the
blades can usually be sealed ("staunched") very well and permanently
by rubbing them into some heat-softened bees' wax or black wax.
Thick glues or fingernail polish may also work, especially if they retain
some flexibility after they set, but "super" glue should not
be used. Large amounts of it are drawn into the tiniest gaps, and it tends
to become extremely hard and brittle in these amounts.
If the binding leaks, which is likely if edge-sealing does not identify
or stop the airflow, one traditional cure is to seal it with shellac, varnish
or fingernail polish. Another is to rub wax over the binding and then roll
the blinding between the hands to warm the wax and force it into any gaps.
Be sure to rub some wax between the highest wrap and the bottom of the
exposed cane blades, where small leaks can often occur especially if modern
thick binding is used. A fast modern cure is to wrap the binding with plumbers'
teflon or PTFE tape. The tape should begin on the cane about 1/8"
above the binding and extend to the bottom of the reed (remove the reed-seat
hemping first) or else 1/8" below the bottom of the binding if your
binding does not extend to the bottom of the staple. The tape is somewhat
impermanent (it may need replacing if the reed his handled frequently)
but it is clean and nonsticky as varnish.
Active Leaks
These are much harder to detect because they are caused by problems
in the blades which do not always appear in the standard inhalation tests.
These are much more serious than static leaks because they are related
to the way the reed behaves. They occur at the top of the blades in 2 areas:
Corners & Edges
 Chips or broken
fibers right can create tiny gaps which sometimes aren't spotted by the
inhalation test. For upper edge leaks, staunching with bees' wax often
works. However if the very upper corners are the problem, wax or glue might
interfere with vibration of the lips, or worsen it if particles get inside
the blades and thereafter prevent the lips from closing completely. A traditional
remedy which sometimes works for leaking corners is to cut away a tiny
portion of the corners at an angle (many makers trim the corners of all
their reeds simply to reduce the risk of damage from routine handling).
Chips or broken
fibers right can create tiny gaps which sometimes aren't spotted by the
inhalation test. For upper edge leaks, staunching with bees' wax often
works. However if the very upper corners are the problem, wax or glue might
interfere with vibration of the lips, or worsen it if particles get inside
the blades and thereafter prevent the lips from closing completely. A traditional
remedy which sometimes works for leaking corners is to cut away a tiny
portion of the corners at an angle (many makers trim the corners of all
their reeds simply to reduce the risk of damage from routine handling).
Lips
It is also possible for air to leak through the lips during the period
in each vibration when they are supposed to be shut tight against the air.
There are 3 common causes:
The inside surface can be rough from prolonged exposure to humidity
or mouth-blowing, which cause small bundles of fibers to swell and thereby
prevent complete closure of the blades. Another source of leakage can be
accidental gouges or inadequate sanding when the blades were being made.
The inner blade surfaces can only be diagnosed and cured by taking the
reed apart. If the inside is rough, the upper interior surfaces of the
blades can be sanded on very fine paper wrapped on a rather large cylinder
3" to 4" in diameter. The cylinder must be large because the
finished blades will have deformed to a much shallower curvature than they
were made with. It is only necessary to sand the topmost 1/8" to 1/4"
because this is the only region which seals as the blades vibrate.
Cane Too Hard
 The cane may
be too hard (more accurately, too stiff) for the particular reedmaking
method you are using. As a result, the blades do not bend enough and the
lips are not sealing completely. Most often, they are closing in the middle
1/2 or so, but are remaining slightly open in parts of the outer 1/4 on
each side. There is a test described by the US reedmaker Benedict Koehler
which identifies this problem neatly. Inhale through the staple strongly
enough to generate a distinct "crow" sound which will stop when
the suction is so strong as to cause the reed to shut. In the first instant
after the blades have clapped shut completely and are re-opening as the
pressure drops, there will be a brief, high-pitched whistle or squeak.
This is caused by brief vibrations of the tiny regions of the lips which
are failing to close under ordinary playing pressure. Click
here for a 79 KB sound sample of this crow from a leaky-lipped reed.
The cane may
be too hard (more accurately, too stiff) for the particular reedmaking
method you are using. As a result, the blades do not bend enough and the
lips are not sealing completely. Most often, they are closing in the middle
1/2 or so, but are remaining slightly open in parts of the outer 1/4 on
each side. There is a test described by the US reedmaker Benedict Koehler
which identifies this problem neatly. Inhale through the staple strongly
enough to generate a distinct "crow" sound which will stop when
the suction is so strong as to cause the reed to shut. In the first instant
after the blades have clapped shut completely and are re-opening as the
pressure drops, there will be a brief, high-pitched whistle or squeak.
This is caused by brief vibrations of the tiny regions of the lips which
are failing to close under ordinary playing pressure. Click
here for a 79 KB sound sample of this crow from a leaky-lipped reed.
June 2009, this will be updated, there are adjustments.
Generally there is no cure for this problem. Future reeds should be made
either with different, softer (more flexible) cane, or the interior curvature
should be reduced (sanding cylinder diameter increased) so that the blades
have less elevation. See the Avoidance notes below.
Although a reed with this problem is often irrepairable, sometimes the
treatment discussed below will work.
Warping of the Lips From Age and Humidity/Drying
Click here
for a brief description and photographs of this very common problem
and ways to fix it. I'll be expanding on it in this article later. You'll
need to click "back" with your browser to return to this point.
Scrape Imbalances
 Shine a light at very low
angle across the scrape laterally and down the face of scrape vertically.
If the blades are basically flat laterally or crosswise, they have essentially
been scraped like regulator reeds. Musical symptoms of this include a very
free, pressure-sensitive and responsive 1st octave, and difficulty getting
into any of the 2nd octave notes much above 2nd octave E. If the problem
is extreme there is no remedy; the reed may become a very nice regulator
reed however, where its overly-scraped centerline is essential to keep
it from jumping the octave with the chanter.
Shine a light at very low
angle across the scrape laterally and down the face of scrape vertically.
If the blades are basically flat laterally or crosswise, they have essentially
been scraped like regulator reeds. Musical symptoms of this include a very
free, pressure-sensitive and responsive 1st octave, and difficulty getting
into any of the 2nd octave notes much above 2nd octave E. If the problem
is extreme there is no remedy; the reed may become a very nice regulator
reed however, where its overly-scraped centerline is essential to keep
it from jumping the octave with the chanter.
 If
side-light shows any shadowed depressions in the center areas, they are
likely causes of 2nd octave trouble. A related problem is an excess of
curvature at the edges of the scrape with insufficent curve in the center
region. Either of these problems can often be cured by a combination of
rescraping and shortening of the blades; the higher such depressions are
on the blades, and the shallower they are (or the less dramatic the unevenness
of the scrape curvature), the less drastic the remedial surgery and the
more likely it will succeed.
If
side-light shows any shadowed depressions in the center areas, they are
likely causes of 2nd octave trouble. A related problem is an excess of
curvature at the edges of the scrape with insufficent curve in the center
region. Either of these problems can often be cured by a combination of
rescraping and shortening of the blades; the higher such depressions are
on the blades, and the shallower they are (or the less dramatic the unevenness
of the scrape curvature), the less drastic the remedial surgery and the
more likely it will succeed.
Fixing Octave Difficulty in Finished Reeds
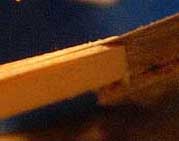 The
general remedy is to thin the upper sides and corners a bit to make them
more flexible compared to the center portion of the lips and to the vertical
centerline of the entire head. But first we need to inspect the reed carefully
to see if any of the corners are too thin for any additional thinning.
The picture shows how to insert a piece of thin cardboard or a razor blade
between the lips of the reed to pry them very slightly apart, so that you
can see which of the 4 corners are thicker and thinner. When thinning corners,
first thin those that are thicker than the others.
The
general remedy is to thin the upper sides and corners a bit to make them
more flexible compared to the center portion of the lips and to the vertical
centerline of the entire head. But first we need to inspect the reed carefully
to see if any of the corners are too thin for any additional thinning.
The picture shows how to insert a piece of thin cardboard or a razor blade
between the lips of the reed to pry them very slightly apart, so that you
can see which of the 4 corners are thicker and thinner. When thinning corners,
first thin those that are thicker than the others.
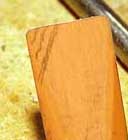 Only
one corner is shown marked here, with the several pencilled lines in the
upper left corner, but the areas to be thinned are on both corners of both
blades except for those corners that are the thinnest.
Only
one corner is shown marked here, with the several pencilled lines in the
upper left corner, but the areas to be thinned are on both corners of both
blades except for those corners that are the thinnest.
If you're lucky, you will ease the mid to upper 2nd octave without affecting
anything else about the reed. But more often the corner thinning will result
in weakening of the back D, which will often become prone to going flat
at a slight increase in pressure. This is cured by trimming the lips very
slightly, using a sharp blade against a firm surface such as smooth hardwood,
formica or linoleum etc., until the back D is strengthened. This won't
harm the octave and may make it even more stable. If the reed has become
too sharp, especially in the 1st octave, and/or too ready to jump the octave
from the bottom hand, balance can be restored by uniformly scraping the
lower 1/2 to 2/3 of the scrape, not changing its shape but removing a small
amount of cane carefully from the entire bottom portion of the scrape.
 One
way to make it easier to thin the sides of the scrape in relation to the
centerline is to squeeze the bridle or collar so much that the lips close
tightly together. This has the effect of pulling the centerline region
of the blades close together, leaving the sides of the scrape more favored
when sanding against a flat surface. Of course if you are using a high-mounted
sliding type bridle it must be removed to expose the scrape. Then fix a
temporary low-mount collar to close the lips. Then either sanding with
fine paper or very careful light scraping with a knife can be focussed
on the outer edges of the existing scrape, and tapered or feathered in
towards the centerline area, with minimal risk to the centerline. Don't
leave the reed bridled shut; immediately remove it, squeeze the edges of
the reed if necessary to help spring it open, and restore your normal permanent
bridle.
One
way to make it easier to thin the sides of the scrape in relation to the
centerline is to squeeze the bridle or collar so much that the lips close
tightly together. This has the effect of pulling the centerline region
of the blades close together, leaving the sides of the scrape more favored
when sanding against a flat surface. Of course if you are using a high-mounted
sliding type bridle it must be removed to expose the scrape. Then fix a
temporary low-mount collar to close the lips. Then either sanding with
fine paper or very careful light scraping with a knife can be focussed
on the outer edges of the existing scrape, and tapered or feathered in
towards the centerline area, with minimal risk to the centerline. Don't
leave the reed bridled shut; immediately remove it, squeeze the edges of
the reed if necessary to help spring it open, and restore your normal permanent
bridle.
Staple Design Flaws
Experimenting with staple dimensions can sometimes cause problems especially
with upper 2nd octave notes A, B and above, if the internal diameter of
the eye end of the staple is too small. If you have existing staples known
to work with a chanter, and you wish to make the upper end of the staple
smaller for some reason, proceed in very small steps and be prepared for
octave trouble.
Avoidance in Future Reeds
The essential point is to avoid weakening the centerline region of the
scrape too much in comparison to the regions on either side. Some commonly
advised precautions for those who frequently have octave trouble in their
reeds follow:
- Establish a laterally convex cross-section at the outset and maintain
it throughout the scraping process. Don't carve out a concave centerline
at the very beginning, hoping to save time. Allow this shape to arise gradually
as the entire scrape is worked down.
- Avoid irregularities, nicks or shallow regions especially near the
centerline. One way to do this is to alternate frequently between the scraping
knife or blade, to create the basic overall surface, and fine sandpaper
on a very flat surface, to smooth the surface of the scrape and remove
local irregularities.
- Fix a low-mount collar early (even if your design uses no collar or
a higher sliding bridle), as soon as the blades are thin enough to make
any sound, and close the lips as much as possible. Be careful, this might
crack the blades if you are using hard or brittle cane and try to close
the lips completely right away.
- Once the reed is sounding, but still thick and strong, test it very
frequently in the chanter. Avoid mouth blowing since the moisture will
soften the cane and cause it to sag and relax rather drastically.
- If using hard cane such as French bassoon cane or California cane,
(corresponding to a sink-percentage of 60% to 70% on the dunk
test), switch to a larger diameter sanding cylinder than your recipe
uses, in order to have less interior curvature and less elevation in the
finished, un-bridled reed. This may be counterintuitive because this will
leave the slip thicker, whereas common sense says that harder, stiffer
cane should be thinner in order to vibrate freely. The 2-part answer is
that, first a deeper scrape which is broader especially in the upper 1/2
will indeed be required, so as to compensate for the extra thickness of
the slip. Second, with the reduced elevation the edges will naturally lie
closer together and therefore even though the cane is stiffer it will be
able to flex and close under ordinary pressure.
References
For the discussion of how the 2nd octave is created I have found nothing
specific in uilleann pipe sources. Although several makers I have seen
giving demonstrations of reedmaking have made sure to work the sides of
the scrape as well as the center areas, (Benedict Koehler and Timothy Britton)
none I have met has said anything about this in relation to creating or
troubleshooting the 2nd octave. I have not seen anything in uilleann pipe
books about this either, in fact there is very little description of how
and where to scrape in books I've seen. Of course I may not have been paying
attention!
There is some specific information in A Handbook on Making Double
Reeds for Early Winds by Keith Loraine, 1982 Musica Sacra et Profana,
pp. 17-25. Another useful text is Bassoon Reed Making by Mark Popkin
and Loren Glickman, 1969 The Instramentalist Co., with good photographs
and discussion of scraping some of which can be applied to uilleann pipe
reeds.
Return to David Daye's Bagpipe Page
End of "Uilleann Pipe Octave Trouble"
�